Tutorial
How To Handle Errors in a Flask Application

The author selected the Free and Open Source Fund to receive a donation as part of the Write for DOnations program.
Introduction
Flask is a lightweight Python web framework that provides useful tools and features for creating web applications in the Python Language.
When you’re developing a web application, you will inevitably run into situations where your application behaves in a way contrary to what you expected. You might misspell a variable, misuse a for loop, or construct an if statement in a way that raises a Python exception, like calling a function before declaring it, or simply looking for a page that doesn’t exist. You’ll find it easier and smoother to develop your Flask applications if you learn how to handle errors and exceptions properly.
In this tutorial, you’ll build a small web application that demonstrates how to handle common errors one encounters when developing a web application. You’ll create custom error pages, use the Flask debugger to troubleshoot exceptions, and use logging to track events in your application.
Prerequisites
-
A local Python 3 programming environment. You can follow the tutorial for your distribution in How To Install and Set Up a Local Programming Environment for Python 3 series. In this tutorial we’ll call our project directory
flask_app. -
An understanding of basic Flask concepts, such as routes, view functions, and templates. If you are not familiar with Flask, check out How to Create Your First Web Application Using Flask and Python and How to Use Templates in a Flask Application.
-
An understanding of basic HTML concepts. You can review our How To Build a Website with HTML tutorial series for background knowledge.
Step 1 — Using The Flask Debugger
In this step, you’ll create an application that has a few errors and run it without debug mode to see how the application responds. Then you’ll run it with debug mode on and use the debugger to troubleshoot application errors.
With your programming environment activated and Flask installed, open a file called app.py for editing inside your flask_app directory:
- nano app.py
Add the following code inside the app.py file:
from flask import Flask

app = Flask(__name__)


@app.route('/')
def index():
    return render_template('index.html')
In the above code, you first import the Flask class from the flask package. Then you create a Flask application instance called app. You use the @app.route() decorator to create a view function called index(), which calls the render_template() function as the return value, which in turn renders a template called index.html. There are two errors in this code: the first is that you did not import the render_template() function, and the second one is that the index.html template file does not exist.
Save and close the file.
Next, inform Flask about the application using the FLASK_APP environment variable using the following command (on Windows, use set instead of export):
- export FLASK_APP=app
Then run the application server using the flask run command:
- flask run
You will see the following information in your terminal:
Output * Serving Flask app 'app' (lazy loading)
 * Environment: production
   WARNING: This is a development server. Do not use it in a production deployment.
   Use a production WSGI server instead.
 * Debug mode: off
 * Running on http://127.0.0.1:5000/ (Press CTRL+C to quit)
This output provides the following information:
-
The Flask application being served (
app.pyin this case) -
The environment, which is
productionhere. The warning message stresses that this server is not for a production deployment. You’re using this server for development, so you can ignore this warning, but for more information, see the Deployment Options page on the Flask documentation. You can also check out this Flask deployment tutorial with Gunicorn, or this one with uWSGI, or you can use DigitalOcean App Platform to deploy your Flask application by following the How To Deploy a Flask App Using Gunicorn to App Platform tutorial. -
The debug mode is off, which means that the Flask debugger is not running, and you won’t receive helpful error messages in your application. In a production environment, displaying detailed errors exposes your application to security vulnerabilities.
-
The server is running on the
http://127.0.0.1:5000/URL. To stop the server, useCTRL+C, but don’t do that just yet.
Now, visit the index page using your browser:
http://127.0.0.1:5000/
You will see a message that looks like the following:
OutputInternal Server Error

The server encountered an internal error and was unable to complete your request. Either the server is overloaded or there is an error in the application.
This is the 500 Internal Server Error, which is a server error response that indicates that the server encountered an internal error in the application code.
In the terminal, you’ll see the following output:
Output[2021-09-12 15:16:56,441] ERROR in app: Exception on / [GET]
Traceback (most recent call last):
  File "/home/abd/.local/lib/python3.9/site-packages/flask/app.py", line 2070, in wsgi_app
    response = self.full_dispatch_request()
  File "/home/abd/.local/lib/python3.9/site-packages/flask/app.py", line 1515, in full_dispatch_request
    rv = self.handle_user_exception(e)
  File "/home/abd/.local/lib/python3.9/site-packages/flask/app.py", line 1513, in full_dispatch_request
    rv = self.dispatch_request()
  File "/home/abd/.local/lib/python3.9/site-packages/flask/app.py", line 1499, in dispatch_request
    return self.ensure_sync(self.view_functions[rule.endpoint])(**req.view_args)
  File "/home/abd/python/flask/series03/flask_app/app.py", line 8, in index
    return render_template('index.html')
NameError: name 'render_template' is not defined
127.0.0.1 - - [12/Sep/2021 15:16:56] "GET / HTTP/1.1" 500 -
The traceback above goes through the code that triggered the internal server error. The line NameError: name 'render_template' is not defined gives the root cause of the problem: the render_template() function has not been imported.
As you can see here, you have to go to the terminal to troubleshoot errors, which is not convenient.
You can have a better troubleshooting experience by enabling the debug mode in your development server. To do so, stop the server with CTRL+C and set the environment variable FLASK_ENV to development, so you can run the application in development mode (which enables the debugger), using the following command (on Windows, use set instead of export):
- export FLASK_ENV=development
Run the development server:
- flask run
You’ll see an output similar to the following in the terminal:
Output * Serving Flask app 'app' (lazy loading)
 * Environment: development
 * Debug mode: on
 * Running on http://127.0.0.1:5000/ (Press CTRL+C to quit)
 * Restarting with stat
 * Debugger is active!
 * Debugger PIN: 120-484-907
Here you see that the environment is now development, debug mode is on, and the debugger is active. The Debugger PIN is a PIN you need to unlock the console in your browser (an interactive python shell you can access by clicking the little terminal icon encircled in the image below).
Refresh the index page on your browser and you’ll see the following page:
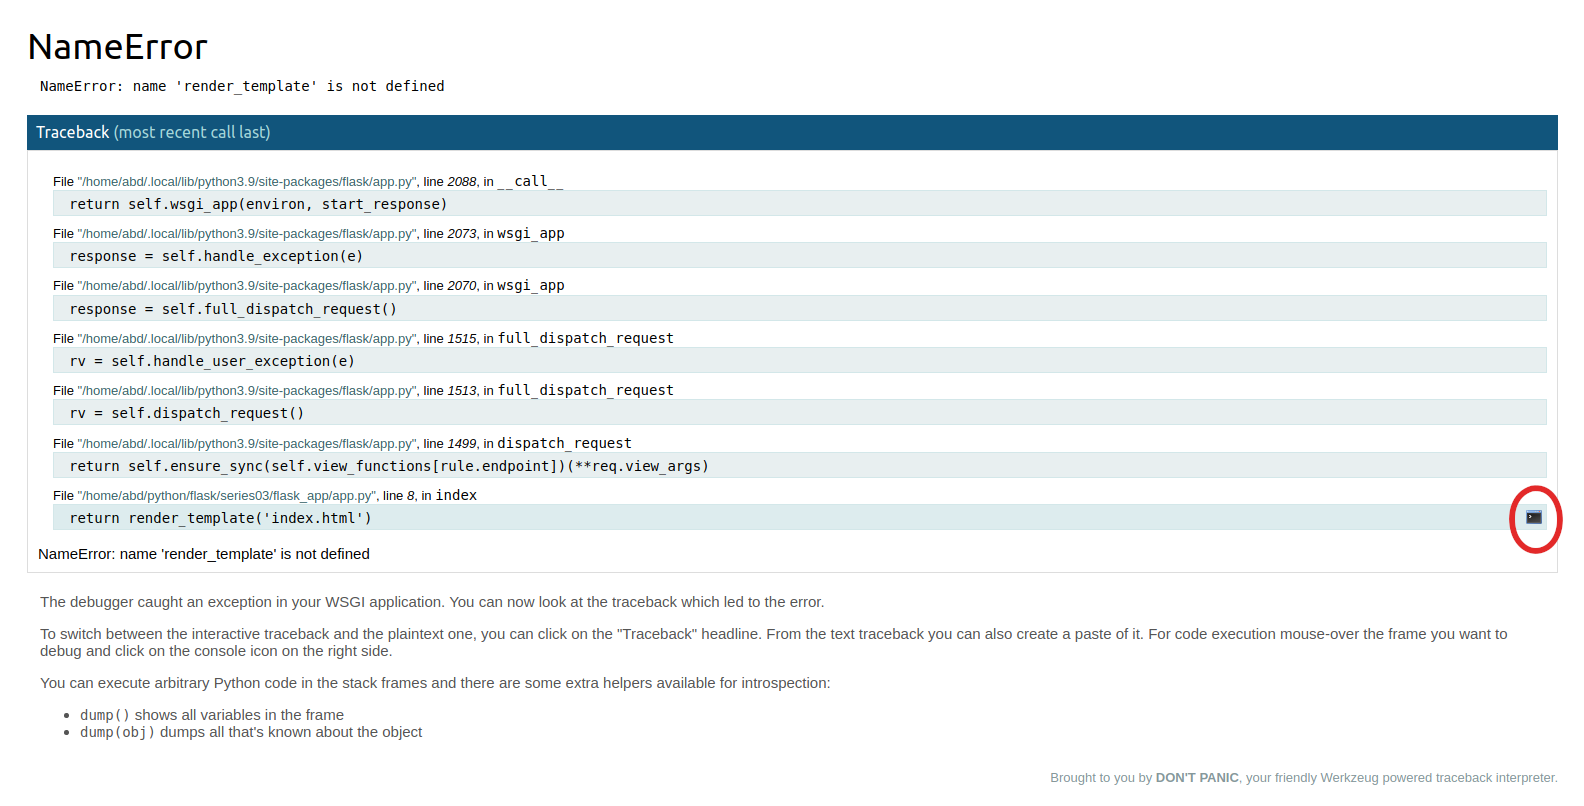
Here, you see the error message displayed in a manner that’s easier to understand. The first heading gives you the name of the Python exception that caused the problem (NameError in this case). The second line gives you the direct reason (render_template() is not defined, which means it’s not imported in this case). Following that, you have the traceback going through the inner Flask code that was executed. Read the traceback from the bottom upward, because the last line in the traceback usually has the most useful information.
Note: The circled terminal icon allows you to run Python code in the browser on different frames. This is useful for when you want to check the value of a variable the way you would do it in a Python interactive shell. When you click the terminal icon, you will need to type in the Debugger PIN code you got when you ran the server. You won’t need this interactive shell in this tutorial.
To fix this NameError issue, leave the server running, open a new terminal window, activate your environment, and open your app.py file:
- nano app.py
Modify the file to look as follows:
from flask import Flask, render_template

app = Flask(__name__)


@app.route('/')
def index():
    return render_template('index.html')
Save and close the file.
Here you imported the render_template() function that was missing.
With the development server running, refresh the index page on your browser.
This time you’ll see an error page with information that looks like so:
Outputjinja2.exceptions.TemplateNotFound
jinja2.exceptions.TemplateNotFound: index.html
This error message indicates that the index.html template does not exist.
To fix this, you’ll create a base.html template file other templates will inherit from to avoid code repetition, then an index.html template that extends the base template.
Create the templates directory, which is the directory where Flask looks for template files. Then open a base.html file using your favorite editor:
- mkdir templates
- nano templates/base.html
Add the following code to your base.html file:
<!DOCTYPE html>
<html lang="en">
<head>
    <meta charset="UTF-8">
    <title>{% block title %} {% endblock %} - FlaskApp</title>
    <style>
        nav a {
            color: #d64161;
            font-size: 3em;
            margin-left: 50px;
            text-decoration: none;
        }
    </style>
</head>
<body>
    <nav>
        <a href="{{ url_for('index') }}">FlaskApp</a>
        <a href="#">About</a>
    </nav>
    <hr>
    <div class="content">
        {% block content %} {% endblock %}
    </div>
</body>
</html>
Save and close the file.
This base template has all the HTML boilerplate you’ll need to reuse in your other templates. The title block will be replaced to set a title for each page, and the content block will be replaced with the content of each page. The navigation bar has two links, one for the index page where you use the url_for() helper function to link to the index() view function, and the other for an About page if you choose to include one in your application.
Next, open a template file called index.html, which will inherit from the base template.
- nano templates/index.html
Add the following code to it:
{% extends 'base.html' %}

{% block content %}
    <h1>{% block title %} Index {% endblock %}</h1>
    <h2>Welcome to FlaskApp!</h2>
{% endblock %}
Save and close the file.
In the code above, you extend the base template and override the content block. You then set a page title and display it in an H1 header using the title block, and display a greeting in an H2 header.
With the development server running, refresh the index page on your browser.
You’ll see that the application displays no more errors and the index page is displayed as expected.
You’ve now used debug mode and seen how to handle error messages. Next, you’ll abort a request to respond with an error message of your choice, and see how to respond with custom error pages.
Step 2 — Creating Custom Error Pages
In this step, you’ll learn how to abort requests and respond with a 404 HTTP error message for when the user requests data that does not exist on the server. You will also learn how to create custom error pages for common HTTP errors, such as the 404 Not Found error, and the 500 Internal Server Error error.
To demonstrate how to abort requests and respond with a custom 404 HTTP error page, you’ll create a page that displays a few messages. If the requested message does not exist, you’ll respond with a 404 error.
First, open your app.py file to add a new route for the messages page:
- nano app.py
Add the following route at the end of the file:
# ...

@app.route('/messages/<int:idx>')
def message(idx):
    messages = ['Message Zero', 'Message One', 'Message Two']
    return render_template('message.html', message=messages[idx])
Save and close the file.
In the route above, you have a URL variable idx. This is the index that will determine what message will be displayed. For example, if the URL is /messages/0, the first message (Message Zero) will be displayed. You use the int converter to accept only positive integers, because URL variables have string values by default.
Inside the message() view function, you have a regular Python list called messages with three messages. (In a real-world scenario, these messages would come from a database, an API, or another external data source.) The function returns a call to the render_template() function with two arguments, message.html as the template file, and a message variable that will be passed to the template. This variable will have a list item from the messages list depending on the value of the idx variable in the URL.
Next open a new message.html template file:
- nano templates/message.html
Add the following code to it:
{% extends 'base.html' %}

{% block content %}
    <h1>{% block title %} Messages {% endblock %}</h1>
    <h2>{{ message }}</h2>
{% endblock %}
Save and close the file.
In the code above, you extend the base template and override the content block. You add a title (Messages) in an H1 heading, and display the value of the message variable in an H2 heading.
With the development server running, visit the following URLs on your browser:
http://127.0.0.1:5000/messages/0
http://127.0.0.1:5000/messages/1
http://127.0.0.1:5000/messages/2
http://127.0.0.1:5000/messages/3
You’ll see that the H2 contains the text Message Zero, Message One, or Message Two respectively on each one of the first three URLs. However, on the fourth URL, the server will respond with an IndexError: list index out of range error message. In a production environment, the response would’ve been a 500 Internal Server Error, but the proper response here is a 404 Not Found to indicate that the server can’t find a message with an index of 3.
You can respond with a 404 error using Flask’s abort() helper function. To do so, open the app.py file:
- nano app.py
Edit the first line to import the abort() function. Then edit the message() view function by adding a try ... except clause as shown in the highlighted parts below:
from flask import Flask, render_template, abort

# ...
# ...


@app.route('/messages/<int:idx>')
def message(idx):
    messages = ['Message Zero', 'Message One', 'Message Two']
    try:
        return render_template('message.html', message=messages[idx])
    except IndexError:
        abort(404)
Save and close the file.
In the code above, you import the abort() function, which you use to abort the request and respond with an error. In the message() view function, you use a try ... except clause to wrap the function. You first try to return the messages template with the message that corresponds to the index in the URL. If the index has no corresponding message, the IndexError exception will be raised. You then use the except clause to catch that error, and you use abort(404) to abort the request and respond with a 404 Not Found HTTP error.
With the development server running, use your browser to revisit the URL that responded with an IndexError earlier (or visit any URL with an index greater than 2):
http://127.0.0.1:5000/messages/3
You will see the following response:
Not Found

The requested URL was not found on the server. If you entered the URL manually please check your spelling and try again.
You now have a better error message that indicates that the server could not find the requested message.
Next, you’ll make a template for the 404 error page and one for the 500 error page.
First, you’ll register a function with the special @app.errorhandler() decorator as a handler for the 404 error. Open the app.py file for editing:
nano app.py
Edit the file by adding the highlighted part as follows:
from flask import Flask, render_template, abort

app = Flask(__name__)


@app.errorhandler(404)
def page_not_found(error):
    return render_template('404.html'), 404


@app.route('/')
def index():
    return render_template('index.html')


@app.route('/messages/<int:idx>')
def message(idx):
    messages = ['Message Zero', 'Message One', 'Message Two']
    try:
        return render_template('message.html', message=messages[idx])
    except IndexError:
        abort(404)
Save and close the file.
Here you use the @app.errorhandler() decorator to register the function page_not_found() as a custom error handler. The function takes the error as an argument, and it returns a call to the render_template() function with a template called 404.html. You will create this template later, and you can use another name if you want. You also return the integer 404 after the render_template() call. This tells Flask that the status code in the response should be 404. If you don’t add it, the default status code response will be 200, which means that the request has succeeded.
Next, open a new 404.html template:
- nano templates/404.html
Add the following code to it:
{% extends 'base.html' %}

{% block content %}
        <h1>{% block title %} 404 Not Found. {% endblock %}</h1>
        <p>OOPS! Sammy couldn't find your page; looks like it doesn't exist.</p>
        <p>If you entered the URL manually, please check your spelling and try again.</p>
{% endblock %}
Save and close the file.
Just like any other template, you extend the base template, you replace the content of the content and title blocks, and you add your own HTML code. Here you have an <h1> heading as the title, a <p> tag with a custom error message telling the user the page was not found, and a helpful message for users who might have entered the URL manually.
You can use whatever HTML, CSS, and JavaScript you want in your error pages in the same way you would in other templates.
With the development server running, use your browser to revisit the following URL:
http://127.0.0.1:5000/messages/3
You’ll see the page now has the navigation bar that’s in the base template and the custom error message.
Similarly, you can add a custom error page for your 500 Internal Server Error errors. Open the app.py file:
- nano app.py
Add the following error handler below the 404 error handler:
# ...

@app.errorhandler(404)
def page_not_found(error):
    return render_template('404.html'), 404


@app.errorhandler(500)
def internal_error(error):
    return render_template('500.html'), 500

# ...
Here you use the same pattern as you did for the 404 error handler. You use the app.errorhandler() decorator with a 500 argument to make a function called internal_error() into an error handler. You render a template called 500.html, and respond with a status code of 500.
Then to demonstrate how the custom error will be presented, add a route that responds with a 500 HTTP error at the end of the file. This route will always give a 500 Internal Server Error regardless of whether the debugger is running or not:
# ...
@app.route('/500')
def error500():
    abort(500)
Here you make a route /500 and use the abort() function to respond with a 500 HTTP error.
Save and close the file.
Next, open the new 500.html template:
- nano templates/500.html
Add the following code to it:
{% extends 'base.html' %}

{% block content %}
        <h1>{% block title %} 500 Internal Server Error {% endblock %}</h1>
        <p>OOOOPS! Something went wrong on the server.</p>
        <p>Sammy is currently working on this issue. Please try again later.</p>
{% endblock %}
Save and close the file.
Here, you do the same thing you did with the 404.html template. You extend the base template, and replace the content block with a title and two custom messages informing the user about the internal server error.
With the development server running, visit the route that responds with a 500 error:
http://127.0.0.1:5000/500
Your custom page will appear instead of the generic error page.
You now know how to use custom error pages for HTTP errors in your Flask application. Next, you’ll learn how to use logging to track events in your application. Tracking events helps you understand how your code behaves, which in turn helps with development and troubleshooting.
Step 3 — Using Logging to Track Events in Your Application
In this step, you will use logging to track events that happen when the server is running and the application is being used, which helps you see what is going on in your application code so you can troubleshoot errors easier.
You have already seen logs whenever the development server is running, which typically look like this:
127.0.0.1 - - [21/Sep/2021 14:36:45] "GET /messages/1 HTTP/1.1" 200 -
127.0.0.1 - - [21/Sep/2021 14:36:52] "GET /messages/2 HTTP/1.1" 200 -
127.0.0.1 - - [21/Sep/2021 14:36:54] "GET /messages/3 HTTP/1.1" 404 -
In these logs, you can see the following information:
127.0.0.1: The host the server was running on.[21/Sep/2021 14:36:45]: The date and time of the request.GET: The HTTP request method. In this case,GETis used to retrieve data./messages/2: The path the user requested.HTTP/1.1: The HTTP version.200or404: The status code of the response.
These logs help you diagnose problems that occur in your application. You can log more information when you want to know more details about certain requests using the logger app.logger Flask provides.
With logging, you can use different functions to report information on different logging levels. Each level indicates an event happened with a certain degree of severity. The following functions can be used:
app.logger.debug(): For detailed information about the event.app.logger.info(): Confirmation that things are working as expected.app.logger.warning(): Indication that something unexpected happened (such as “disk space low”), but the application is working as expected.app.logger.error(): An error occurred in some part of the application.app.logger.critical(): A critical error; the entire application might stop working.
To demonstrate how to use the Flask logger, open your app.py file for editing to log a few events:
- nano app.py
Edit the message() view function to look as follows:
# ...

@app.route('/messages/<int:idx>')
def message(idx):
    app.logger.info('Building the messages list...')
    messages = ['Message Zero', 'Message One', 'Message Two']
    try:
        app.logger.debug('Get message with index: {}'.format(idx))
        return render_template('message.html', message=messages[idx])
    except IndexError:
        app.logger.error('Index {} is causing an IndexError'.format(idx))
        abort(404)

# ...
Save and close the file.
Here, you logged a few events on different levels. You use app.logger.info() to log an event that’s working as expected (which is an INFO level). You use app.logger.debug() for detailed information (DEBUG level), mentioning that the application is now getting a message with a specific index. Then you use app.logger.error() to log the fact that an IndexError exception has been raised with the specific index that caused the issue (ERROR level, because an error occurred).
Visit the following URL:
http://127.0.0.1:5000/messages/1
You’ll see the following information in the terminal where your server is running:
Output
[2021-09-21 15:17:02,625] INFO in app: Building the messages list...
[2021-09-21 15:17:02,626] DEBUG in app: Get message with index: 1
127.0.0.1 - - [21/Sep/2021 15:17:02] "GET /messages/1 HTTP/1.1" 200 -
Here you see the INFO message app.logger.info() logs, and the DEBUG message with the index number that you logged using app.logger.debug().
Now visit a URL for a message that does not exist:
http://127.0.0.1:5000/messages/3
You’ll see the following information in the terminal:
Output[2021-09-21 15:33:43,899] INFO in app: Building the messages list...
[2021-09-21 15:33:43,899] DEBUG in app: Get message with index: 3
[2021-09-21 15:33:43,900] ERROR in app: Index 3 is causing an IndexError
127.0.0.1 - - [21/Sep/2021 15:33:43] "GET /messages/3 HTTP/1.1" 404 -
As you can see, you have INFO and DEBUG logs that you’ve seen before, and a new ERROR log because a message with an index of 3 does not exist.
Logging events, detailed information, and errors helps you identify where something went wrong and makes troubleshooting easier.
You’ve learned in this step how to use the Flask logger. Check out How To Use Logging in Python 3 for a better understanding of logging. For an in-depth look at logging, see the Flask logging documentation and the Python documentation for logging.
Conclusion
You now know how to use debug mode in Flask, and how to troubleshoot and fix some common errors you may encounter when developing a Flask web application. You’ve also created custom error pages for common HTTP errors, and you’ve used the Flask logger to track events in your application to help you inspect and figure out how your application behaves.
If you would like to read more about Flask, check out the Flask topic page.
Thanks for learning with the DigitalOcean Community. Check out our offerings for compute, storage, networking, and managed databases.
Tutorial Series: How To Build Web Applications with Flask

Flask is a lightweight Python web framework that provides useful tools and features for creating web applications in the Python Language. It gives developers flexibility and is an accessible framework for new developers because you can build a web application quickly using only a single Python file. Flask is also extensible and doesn’t force a particular directory structure or require complicated boilerplate code before getting started. Learning Flask will allow you to quickly create web applications in Python. You can take advantage of Python libraries to add advanced features to your web application, like storing your data in a database, or validating web forms.
author
This textbox defaults to using Markdown to format your answer.
You can type !ref in this text area to quickly search our full set of tutorials, documentation & marketplace offerings and insert the link!


Get our biweekly newsletter
Sign up for Infrastructure as a Newsletter.

Hollie's Hub for Good
Working on improving health and education, reducing inequality, and spurring economic growth? We'd like to help.

Become a contributor
Get paid to write technical tutorials and select a tech-focused charity to receive a matching donation.
